Get the Best Performance on Your Next.js App
Get the Best Performance on Your Next.js App

Do you want to get 100 percent performance on your website with Next.js? Here is a collection of tricks to get it.
1. Load only the JavaScript and CSS you need.
To find out if this is a problem, you can use the Coverage tab in the DevTools.
This tab is a bit hidden, but it tells you the % usage of your files.
When you click on a file, it shows you the lines that are used:

2. Lazy Loading of dependencies
Use dynamic imports to load components and libraries only when you don’t need them instantly.
By using next/dynamic, the header component will not be included in the page’s initial JavaScript bundle. The page will render the Suspense fallback first, followed by the Header component when the Suspense boundary is resolved.
An example of dynamic component import with JavaScript code:
import dynamic from 'next/dynamic'

const DynamicHeader = dynamic(() => import('../components/header'), {
  loading: () => <p>Loading...</p>,
})

export default function Home() {
  return <DynamicHeader />
}
Example with an external library:
import { useState } from 'react'

const names = ['Tim', 'Joe', 'Bel', 'Lee']

export default function Page() {
  const [results, setResults] = useState()

  return (
    <div>
      <input
        type="text"
        placeholder="Search"
        onChange={async (e) => {
          const { value } = e.currentTarget
          // Dynamically load fuse.js
          const Fuse = (await import('fuse.js')).default
          const fuse = new Fuse(names)

          setResults(fuse.search(value))
        }}
      />
      <pre>Results: {JSON.stringify(results, null, 2)}</pre>
    </div>
  )
}
3. Use the ![]() component from Next.js
component from Next.js
The Next.js Image component extends the HTML element with features for automatic image optimization:
-
Size Optimization: Automatically serve correctly sized images for each device, using modern image formats like WebP and AVIF.
-
Visual Stability: Prevent layout shift automatically when images are loading.
-
Faster Page Loads: Images are only loaded when they enter the viewport using native browser lazy loading, with optional blur-up placeholders.
-
Asset Flexibility: On-demand image resizing, even for images stored on remote servers
An example of the use of the component:
import Image from 'next/image'
import profilePic from '../public/me.png'

export default function Page() {
  return (
    <Image
      src={profilePic}
      alt="Picture of the author"
      width={500}
      height={500}
    />
  )
}
4. Prefer CSS over JavaScript
CSS has improved a lot and is becoming more and more powerful. Nowadays you can make certain sliders and UIs without JS.
Check and learn how to use CSS because:
-
The solution takes up less space than JS usually does
-
Evaluation is much faster
-
Does not block the main thread
-
Better UX
5. Avoid showing a loader at the beginning
Sometimes we put a loading screen at the beginning, which is fatal for the user’s perception of loading! Optimise your website so that it renders on the server and can display useful information from the start.
Instead of a loader you can also use React’s Suspense component for some small sections. With this convention, you can show an instant loading state from the server while the content of a route segment loads. The new content is automatically swapped in once rendering is complete.

6. Use the Next.js Font Optimization
next/font will automatically optimize your fonts (including custom fonts) and remove external network requests for improved privacy and performance.
next/font includes built-in automatic self-hosting for any font file. This means you can optimally load web fonts with zero layout shift, thanks to the underlying CSS size-adjust property used.
This new font system also allows you to conveniently use all Google Fonts with performance and privacy in mind. CSS and font files are downloaded at build time and self-hosted with the rest of your static assets. No requests are sent to Google by the browser.
An example of the use of Google fonts using next/font:
import { Inter } from 'next/font/google'

// If loading a variable font, you don't need to specify the font weight
const inter = Inter({ subsets: ['latin'] })

export default function MyApp({ Component, pageProps }) {
  return (
    <main className={inter.className}>
      <Component {...pageProps} />
    </main>
  )
}
7. Script Optimization
To load a third-party script for all routes, import next/script and include the script directly in your custom component:
import Script from 'next/script'

export default function MyApp({ Component, pageProps }) {
  return (
    <>
      <Component {...pageProps} />
      <Script src="https://example.com/script.js" />
    </>
  )
}
This script will load and execute when any route in your application is accessed. Next.js will ensure the script will only load once, even if a user navigates between multiple pages.
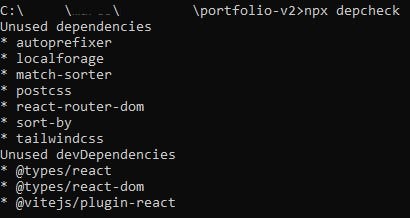
8. Remove unused packages
Sometimes we forget to remove packages that are defined in package.json but no longer needed. You can check those items by running npx depcheck. depcheck *Check dependencies in your node module. Latest version: 1.4.7, last published: 5 months ago. Start using depcheck in…*www.npmjs.com
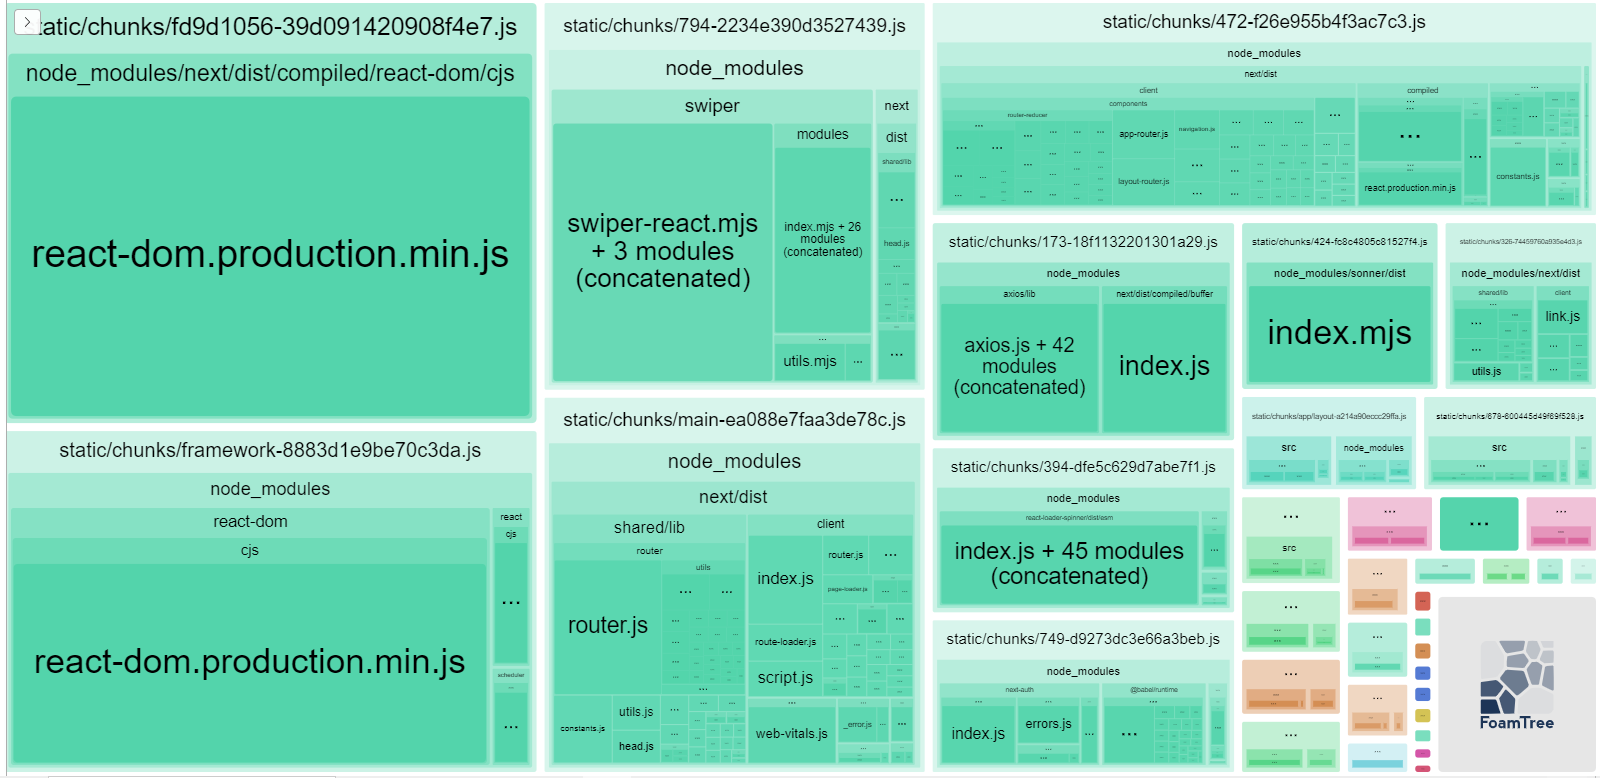
9. Check the current bundle size
@next/bundle-analyzer enables you to visually analyze the bundle size. The bigger the cell is, the larger the size of the modules. The installation guide is available in the document.
@next/bundle-analyzer
*Use webpack-bundle-analyzer in your Next.js project. Latest version: 14.1.3, last published: 3 days ago. Start using…*www.npmjs.com
10. Use Server Components
React Server Components allow you to write UI that can be rendered and optionally cached on the server.
There are a couple of benefits to doing the rendering work on the server, including:
-
Data Fetching: Server Components allow you to move data fetching to the server, closer to your data source. This can improve performance by reducing time it takes to fetch data needed for rendering, and the number of requests the client needs to make.
-
Security: Server Components allow you to keep sensitive data and logic on the server, such as tokens and API keys, without the risk of exposing them to the client.
-
Initial Page Load and First Contentful Paint (FCP): On the server, we can generate HTML to allow users to view the page immediately, without waiting for the client to download, parse and execute the JavaScript needed to render the page.
-
Search Engine Optimization and Social Network Shareability: The rendered HTML can be used by search engine bots to index your pages and social network bots to generate social card previews for your pages.
-
Streaming: Server Components allow you to split the rendering work into chunks and stream them to the client as they become ready. This allows the user to see parts of the page earlier without having to wait for the entire page to be rendered on the server.